Kayak Fishing Adventures on Big Water’s Edge  

Go Back   Kayak Fishing Adventures on Big Water’s Edge > Kayak Fishing Forum - Message Board > General Kayak Fishing Discussion
Home Forum Online Store Information LJ Webcam Gallery Register FAQ Community Calendar Today's Posts Search

Reply
 
Thread Tools Display Modes
Old 01-12-2010, 01:30 PM   #1
Fiskadoro
.......
 
Fiskadoro's Avatar
 
Join Date: Jan 2009
Posts: 1,509
Nice inovation with the larger tubes.

A few comments: They are about twice as long as the need to be. The reason outriggers are long on outrigger canoes is one outrigger works both sides keeping it from rolling one way do to floatation but keeping it from rolling the other way because of it's weight, and a lever effect.

You want the shorter pole as the poles will come out of the water faster do to the angle if the are shorter and you then have less drag. Your fishing essentially a trimaran, so you have flotation on both sides and they can be much shorter with your setup then they could be with a single.

For the same reason it's good to use the scotty in the high position as it improves the angle of the pole in reference to the water and once again reduces drag.

I'd make a few other changes as well.

I would carve out the blunt fat end of the floats so they will slip over the T and then notch them so that you can slide them together tight and butt the two big ends together flush. That will make the float into one clean unit, with no open space between the floats to catch water and increase drag.

I would also take the black main tubes heat them up with a heat gun and put a curve in them. That way they can come out of the top of the float be out of the water and will act more like a traditional ourigger from an outrigger canoe.


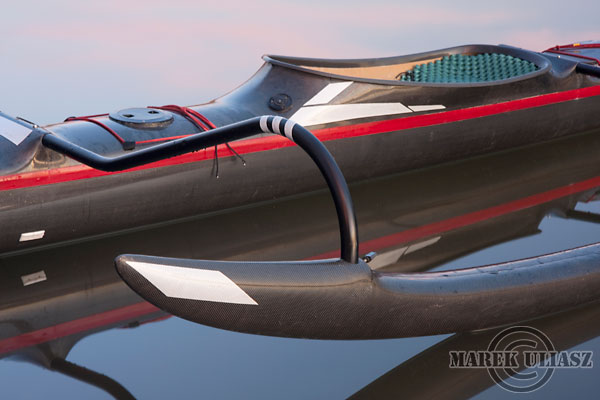
Nice stuff. Well thought out, well done.

Jim
Fiskadoro is offline   Reply With Quote
Old 01-12-2010, 02:47 PM   #2
MalibuJohnny
Senior Member
 
MalibuJohnny's Avatar
 
Join Date: May 2008
Location: Lahina (I Wish)
Posts: 272
Outriggers

Is this where you got the "IDEA"

http://www.yak-gear.com/outriggers.html

http://www.kayakfishingstuff.com/dru...yak-outriggers

Here is a cool design and "DYI" instructions

http://homepages.paradise.net.nz/garyd/quikama.html
__________________
Malibu Johnny
must catch fish
MalibuJohnny is offline   Reply With Quote
Old 01-12-2010, 05:06 PM   #3
senojmj
Paddle, Fish, Repeat
 
senojmj's Avatar
 
Join Date: Jan 2010
Location: Salt Lake City, UT
Posts: 26
That is good to know. I always wondered how outrigger canoes worked and didn't tip on the side without the outrigger. I haven't tried using a heat gun on pvc. Can you just bend it once heated? Any ideas how to get both poles to have the curvature? I think I will have to practice a bit. Thanks for the feedback!
senojmj is offline   Reply With Quote
Old 01-12-2010, 05:39 PM   #4
Fiskadoro
.......
 
Fiskadoro's Avatar
 
Join Date: Jan 2009
Posts: 1,509
Quote:
Originally Posted by senojmj View Post
That is good to know. I always wondered how outrigger canoes worked and didn't tip on the side without the outrigger. I haven't tried using a heat gun on pvc. Can you just bend it once heated? Any ideas how to get both poles to have the curvature? I think I will have to practice a bit. Thanks for the feedback!
I was thinking that was black ABS, but both will bend.


What you want to do is get it on a clean surface and roll it back and forth while moving the gun up an down the length of it. The idea is to get it all hot evenly and then when it gets flexible make one bend full length one time.

Wear gloves as it's hot.

To make the second one the same: lay the first on down next to the second one right when you get it ready to bend and use it as a pattern, or just cut an exact pattern of the bend out of cardboard, don't use it as a form but more of a guideline.

Jim
Fiskadoro is offline   Reply With Quote
Old 01-12-2010, 05:55 PM   #5
senojmj
Paddle, Fish, Repeat
 
senojmj's Avatar
 
Join Date: Jan 2010
Location: Salt Lake City, UT
Posts: 26
Quote:
Originally Posted by Jim Day View Post
I was thinking that was black ABS, but both will bend.


What you want to do is get it on a clean surface and roll it back and forth while moving the gun up an down the length of it. The idea is to get it all hot evenly and then when it gets flexible make one bend full length one time.

Wear gloves as it's hot.

To make the second one the same: lay the first on down next to the second one right when you get it ready to bend and use it as a pattern, or just cut an exact pattern of the bend out of cardboard, don't use it as a form but more of a guideline.

Jim
It is ABS, but I thought they would both behave in the same way. I think I got some spare abs that I will practice with. Thanks for the help, I appreciate it.
senojmj is offline   Reply With Quote
Old 02-03-2011, 07:48 PM   #6
YAKGEAR
Junior
 
Join Date: Feb 2011
Posts: 1
Outriggers

I will take your attempt at building your own Outriggers as the sincerest form of flattery. I thought I would help you through a couple of your rough spots. First of all, cut the pvc that is coming out of your floats so that it is even with the end of the bullet nose of your floats. Pick up some 1/2 inch PVC caps and cap off the ends. Water moving into the open ends will create drag. To get a correct feel for the length of the arms you want, put your kayak on the ground instead of on milk crates. Lower your arms so the floats are touching the ground. This will give you the same feel as when they are in the water. You want to use the top of the deck mount and not the side. The top gives you a lot more adjustments. Lastly, the longer the arms stretch out, the more you hinder your turning radius. I recommend you cut your arms to no more than 40 inches. The Outriggers that we sell, have 30 inch arms. That length was decided on after many people used them and I listened to their recommendations. If you have any questions, I am always glade to help. Email me at bbragman@yak-gear.com
YAKGEAR is offline   Reply With Quote
Old 02-04-2011, 05:30 AM   #7
Kaijuu
"Floater"
 
Join Date: Sep 2010
Location: so cal
Posts: 164
An option to heat

If you dont feel comfortable trying to heat and bend the ABS, Just use a 45* or 90* elbo. Cut glue. Makes it easy to pair up both sides.

You can experiment with different lengths for main and down tubes before gluing.

Just a thought.
Kaijuu is offline   Reply With Quote
Old 02-04-2011, 06:57 AM   #8
dsafety
Olivenhain Bob
 
dsafety's Avatar
 
Join Date: May 2008
Location: Olivenhain, CA
Posts: 1,123
I have some experience with using the various ells that are available for ABS pipes to make curves. You can see the results in the ajustbable rod holder shown in the photos below.

Pieces.jpg

Outboard-close.jpg

If I were building something like this, I would position a 90 degree ell close to the scotty rod holder and build off of that. This would start the curve process and reduce the center of gravity. From there you could use some of the other angle ells to position the pontoons where you want them to be.

Heating the PVC to make it curve is another option but in my experience getting the pipe hot enough to work with, is a bit of an art. It is really easy to overheat the pipe and cause it to start to bubble. I also suspect that PVC which has been heated and cooled a couple of times becomes more brittle than unheated material.

Once you get the design down, consider mounting one pontoon on the stern and the other at the bow. It might look lame but I bet you would get maximum stability out of that setup.

Bob
dsafety is offline   Reply With Quote
Reply


Posting Rules
You may not post new threads
You may not post replies
You may not post attachments
You may not edit your posts

BB code is On
Smilies are On
[IMG] code is On
HTML code is On

Forum Jump


All times are GMT -8. The time now is 04:47 PM.


Powered by vBulletin® Version 3.8.11
Copyright ©2000 - 2025, vBulletin Solutions Inc.
© 2002 Big Water's Edge. All rights reserved.