|
|||||||
| Home | Forum | Online Store | Information | LJ Webcam | Gallery | Register | FAQ | Community | Calendar | Today's Posts | Search |
 |
|
|
Thread Tools | Display Modes |
 07-05-2008, 07:53 AM
|
#1 |
|
Olivenhain Bob

Join Date: May 2008
Location: Olivenhain, CA
Posts: 1,121
|
Revo Accessory Bar w/ Rodholders
The problem that I was trying to solve is that on the Revo, the molded rod holders are positioned too far back to allow for easy access. They also do not angle away from the boat the way I prefer while trolling. The solution, build an accessory bar that fits in the molded rod holders. Using a combination of 1.25" PVC and 1.5" ABS plus a few fittings, I came up with what you see in the photos below. Rather than gluing everything together, I decided to make this device in three pieces for easy transport and storage. The two side pieces fit in the molded rod holders. The top piece, once attached, (fricton fit only), locks everything in place. The assembled bar is very stable and stiff. When on the water, I find that it is much easier for me to reach the rods stored in the holders on this bar. In addition, the rods are angled out in a better trolling position. Just to be safe, I attached a couple rod leashes to the bar. So far, I have only used this device to hold my rods. There are many other potential uses. The top bar has a lot of space to mount other accessories. Some ideas that come to mind are lights, net or gaff holders, flag mast... The possibilities are nearly endless. The best thing is that you can easily experiment without drilling mounting holes in the kayak. The total cost to build this trolling bar came to about $20. Bob Trolling-Bar-Sections-sm.jpg Trolling-Bar-2-sm.jpg 002.jpg 003.jpg 004.jpg |

|

|
|
07-05-2008, 08:28 AM
|
#2 |
|
Senior Member

Join Date: Feb 2007
Location: Santee
Posts: 821
|
dud thats sweet smart thinkin wtg
|
|
|
|
|
07-05-2008, 12:57 PM
|
#3 |
|
Member
Join Date: Jun 2008
Location: Los Angeles
Posts: 46
|
Very nice works
 . I'm gonna build my own. . I'm gonna build my own.
|
|
|
|
|
07-05-2008, 06:47 PM
|
#4 |
|
I eats what I kills

Join Date: Apr 2008
Location: San Diego
Posts: 393
|
Bob nice!
 What is the FF setup? marco
__________________
Please release bill-fish. |
|
|
|
|
07-05-2008, 07:22 PM
|
#5 |
|
Olivenhain Bob
Join Date: May 2008
Location: Olivenhain, CA
Posts: 1,121
|
FF Setup
I cannot take credit for the fish finder mount. I got the idea from some posts that I saw a few months ago and refined it a bit. Basically, you just attach some platform that is large enough to mount the fish finder to some 1/2" PVC pipe and stick the mount in the Hobie sail hole. Electrical tape makes the pipe fit snugly. I used a bunch of reducer fittings to make the platform and then glued a rubber pad to the fittings. The fish finder is attached to the rubber by screws. It works great.
The unit is out of the way, easy to see and easily removable. Batteries are inside the kayak and cables are run through the hull. Some people have drilled holes in the kayak for the cables. I just run mine under the front hatch lid. The setup is not completely waterproof but then neither is the hatch without the cables. Bob |
|
|
|
|
07-06-2008, 01:09 PM
|
#6 |
|
Member

Join Date: Mar 2007
Location: Long Beach / Lakewood
Posts: 85
|
I ran mine through the sail mast and through the PVC. Eagle's have the small connector that do that.
Here my post from a few months ago This is my design Using the sail mast receptacle However I detached the original base and crafted a double pivot base with a transducer wire pass through Hope this is helpful None of the pieces are glued down especially the cap Sometimes you might need to take a section off to more easily pass the wire The whole assembly goes into the sail mast receptacle including the pass through wires Just 1. 1 2ft piece of 1/2 PVC 2. 1 four-way T 3. 4 90deg elbows 4. a 1/2 cap -drilled 5. 4 spare sections of 1/2 pvc l(like 2 in maybe each) 6. 4 in or so piece of 1/2 in pvc 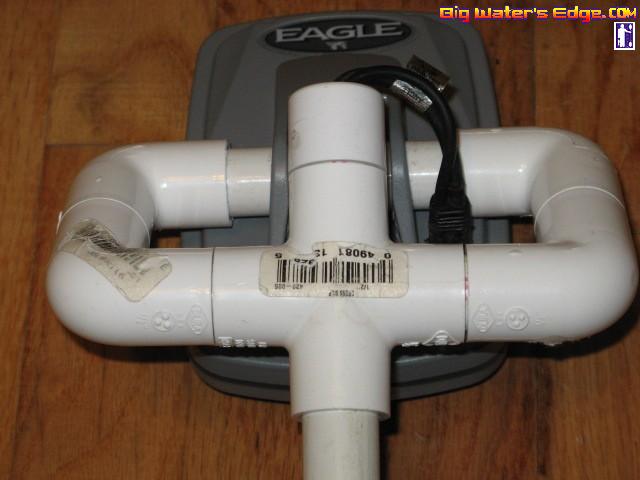 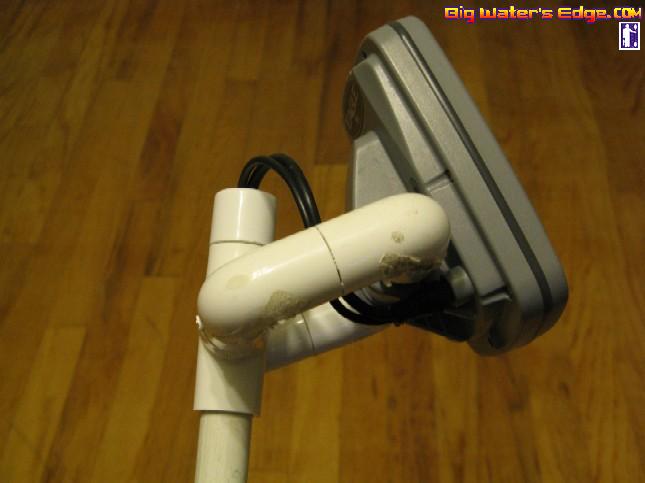 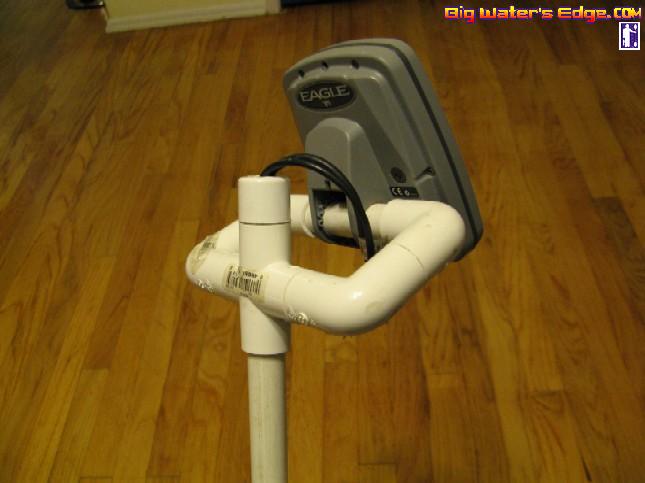 __________________
Hobie Mirage Revolution Prowler 13 - Look ma no hands |
|
|
|
|
07-06-2008, 04:17 PM
|
#7 |
|
I eats what I kills
Join Date: Apr 2008
Location: San Diego
Posts: 393
|
Thanks for the FF mount info....off to home depot!

__________________
Please release bill-fish. |
|
|
|
|
07-06-2008, 07:43 PM
|
#8 |
|
Spam Sanitation Dept

Join Date: Jan 2007
Posts: 1,375
|
Very cool and innovative, thanks for sharing!

__________________

|
|
|
|
|
07-07-2008, 05:14 AM
|
#9 |
|
Senior Member

Join Date: Nov 2007
Location: San Diego
Posts: 279
|
Very nice!
I have been working on a simular system for the back. I will be adding 2 more mounts for my Gaff and net as well as the side rod holders. I origanally had the same idea for the FF but opted for a closer mount to the seat. I still use the mast mount for my cone light for night time. I have it on an elbow joint for multi-directional lighting. Thank you Waldo Semon and B.F Goodrich for making PVC what it is today.
__________________
Don't try to confuse me with facts! I hereby reject your reality and submit my own. |
|
|
|
|
|
|


 Linear Mode

