|
|||||||
| Home | Forum | Online Store | Information | LJ Webcam | Gallery | Register | FAQ | Community | Calendar | Today's Posts | Search |
 |
|
|
Thread Tools | Display Modes |
|
|
 12-07-2009, 09:18 PM
|
#1 |
|
Wayne

Join Date: Dec 2008
Location: Carlsbad, CA
Posts: 98
|
Innovations
You might want to do something like this to keep kelp polyps, grass and crap out of the intake tube of your new bait tank. I used pure silver wire bought from a bead shop so it won't corrode. Not as simple as a screen, but I like the way it looks and works. I know it won't fall off.
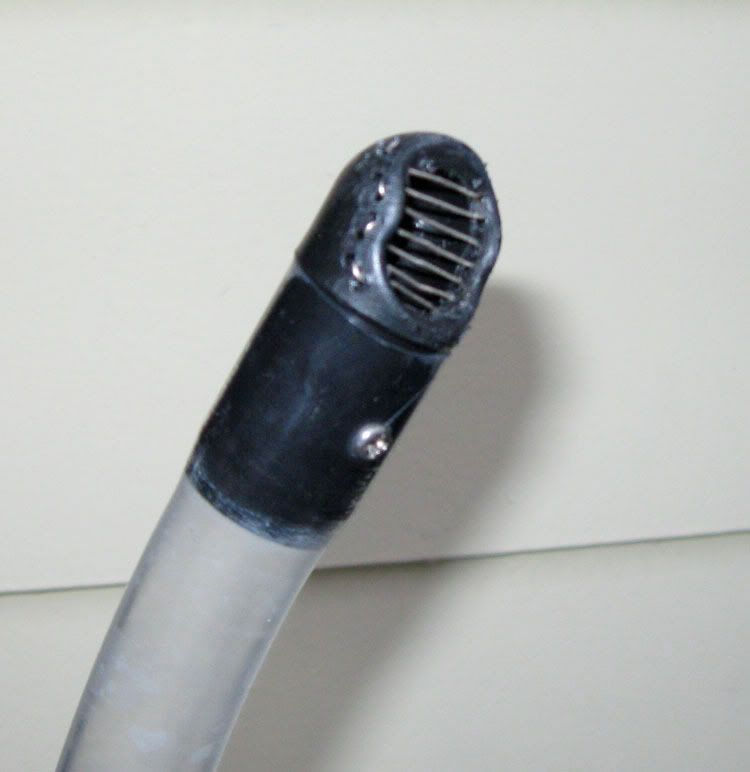 Also, be careful of the collar around the outflow tube. It can come loose if your not careful. Wayne |

|

|
|
12-11-2009, 02:38 PM
|
#2 |
|
Olivenhain Bob

Join Date: May 2008
Location: Olivenhain, CA
Posts: 1,121
|
Homemade Gear Leash
I have not been happy with the leashes that I have found for sale. The ones using shock cord are too heavy and the cord exerts too much pressure when stretched. The ones that work well are kind of expensive. In today's class, I will show you how to make one at home for almost nothing.
Like most people, I have a bunch of old cell phone car chargers hanging around. Every new phone I get seems to require a different plug and therefore a new car charger. For this project we will be putting the curly cables from those old charges to a new use. Start by cutting both ends off an old cable. If you don't have one, you can use a phone handset cable, ($5 at Home Depot). Cut.jpg Plastic snap clips that are easy to use are hard to find. I found something usable at REI, ($2 for a pair of clips). These clips have to be modified a bit. Spread the clip apart and pull the strap attach point out. Slide a 3/4" piece of shrink wrap over the cord and then thread the cord through the hole in the snap clip. Slide a large crimp sleeve over the end of the cord and pull the end of the cord as far through the sleeve as you can. You may have to trim some of the cord material in order to get it to fit into the sleeve. Trim the cord so it is flush with the end of the sleeve Sleave.jpg Take a sheet metal screw and screw it into the open end of the sleeve leaving about 1/16" gap between the screw head and the sleeve. Crimp the sleeve over the screw threads. End.jpg Spread the clip again and pull the cord so that the sleeve slides into the clip body and the screw head seats itself in place. Assembly.jpg Crimp the bottom of the sleeve around the cord. Slide the shrink wrap as far as you can up toward the screw and heat to shrink the material. The final result will look like this. Finished-Leash.jpg I like this leash better than any I have seen in stores. It stretches to over seven feet and recoils out of the way. Perfect for rods. You could make shorter ones for things like gaffs, pliers or Hobie Mirage drives that are used in more confined areas. Bob Last edited by dsafety; 12-12-2009 at 06:36 AM. |
|
|
|
|
12-11-2009, 04:17 PM
|
#3 |
|
Senior Member
Join Date: Nov 2009
Posts: 149
|
Cool stuff.
|
|
|
|
|
12-11-2009, 07:55 PM
|
#4 |
|
Senior Member

Join Date: Sep 2006
Location: Bay Ho
Posts: 1,382
|
OK.....Mr. and Mrs. Sea Bass the time is almost upon us so I will share a little.
These are (2) of the finest improvised Kayak Fishing tools I have used. The first is a New Silent Kelp Clip for those WSB missions that take you into the spaghetti. This clip takes up No room at all, nor does it make any metallic sound. Its very easy to use, Just grab 2 or 3 single strands of kelp and Cuff it. Tie the other end to your kayak. It will not slip do to wind or current, and you do not have to pile 25 lbs. of salad on your Kayak to anchor. -A joint venture between Me and Elbie. ----------------------- Item #2 is a De- Hooking Tool for your Sabiki Rig. Hold it by the Cork End and use the hook end to grab the line in front of your hooked Mackerel. Just lift and it will invert the hook letting the Mackerel fall off. Never again will you have to deal with pliers, or your bare hand around those nasty hooks. This thing work like magic. Yes, it floats. -I first started using a piece of coat hanger, and making 2 tight loops and a short shaft with the hooked end. I would wear it on my finger like a ring. I gave away a bunch of them at the launch every time somebody would ask..What the hell is that ? ..I gave them one.  -This type you see here is the 2nd generation version that has been improved upon by Rick Robinson. Its a Brass Rod (no rust) and a Champagne Cork. He now operates a factory in China and sells them by the gross.  
Last edited by Billy V; 12-11-2009 at 08:17 PM. |
|
|
|
|
12-11-2009, 10:05 PM
|
#5 |
|
Guerro Grande

Join Date: Jan 2006
Location: Houston, TX
Posts: 629
|
I added a nut protector/gimbal-type device to my hatch. It gives you a sturdy place to plant the rod butt on extended fights. The positioning on this one was a little off and it left the rod in a slightly awkward position. My next one will have an extension that will move it farther back towards me. On launch and landing I just turn the hatch around and its out of the way.
 I make my own leashes. 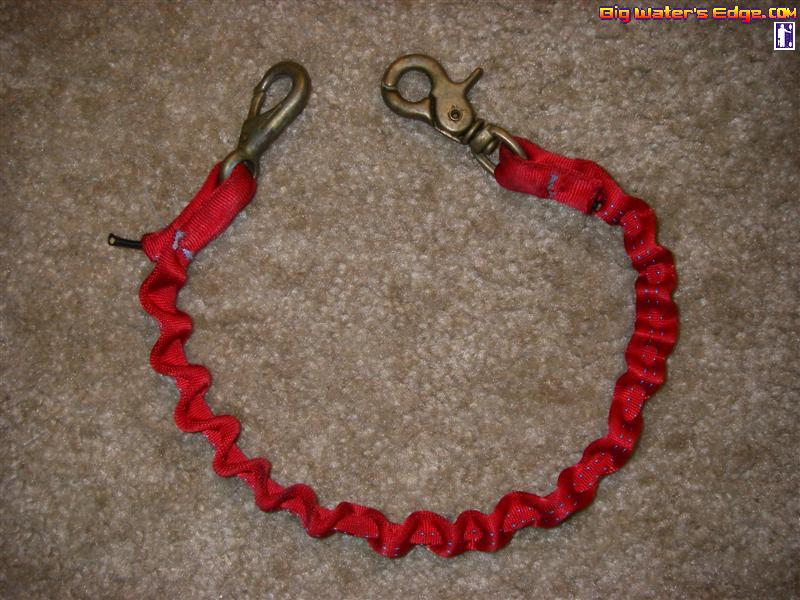 I use hollow nylon strap (blue stuff on left), thin bungee cord (black) and brass snap hooks. 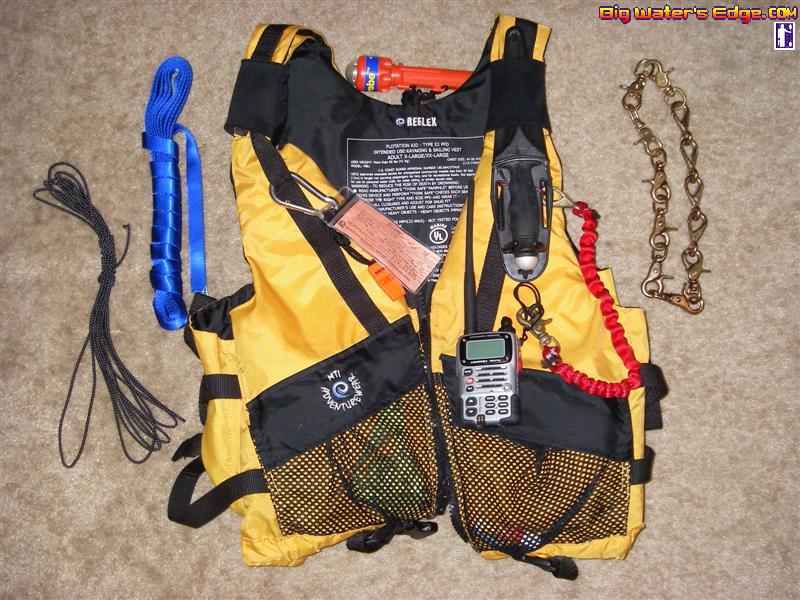 You cut the bungee cord about 50-70% the length of the strap (depends on the thickness and pliability of the strap). I unfold a coat hanger, bend back an inch at one end of the hanger, slip it through the strap, double the bungee around the hook and pull it back through. You gather the strap onto the bungee and secure both ends. The strap end is fed through the swivel of the snap hook, folded over onto itself, and sewn into place with nylon thread. It takes a little time and you need to have good sewing needles (upholstery or leather needles work well). I have been able to knock out five or six in an evening I use SS rings (split or solid) as the leash attachment point for my rods. They are held on with big, UV resistant zip ties. 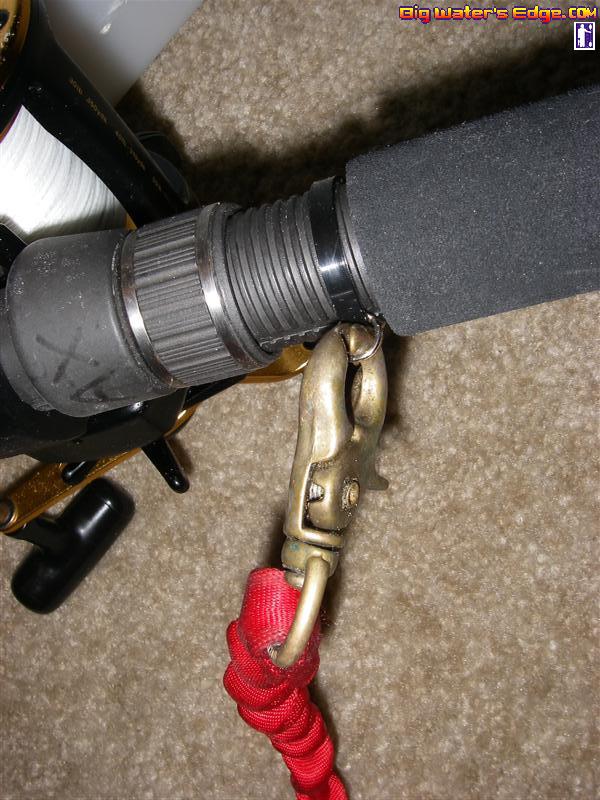 If you run electrical wires or cables the length of your yak, you might want to route them along the underside of the deck, to keep the bottom of the yak clear for rod storage. I used short sections of aluminum angle or C channel attached to the underside of the deck. 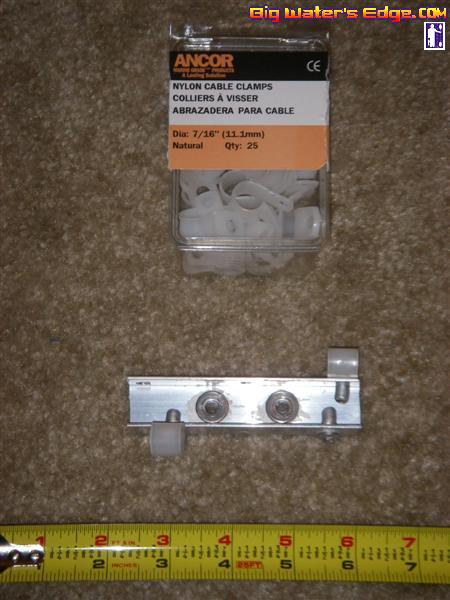 The aluminum channel also served as a backer for the RAM tube rod holders mounted on the deck above. This provided greater strength for the RAM mount and also gave me an attachment point for cable routing. I riveted nylon cable hangers to the lips on the C channel. For easy wiring changes, you should cut the nylon cable hangers at the base of the loop. It will hold the wires securely, but you can still bend it back and pull them out. The rigors of use in a kayak can cause battery terminals to fail. They are prone to corrosion and repeatedly connecting and disconnecting can put a lot of mechanical strain on them. To avoid this, I permanently attach a wire harness to the battery. 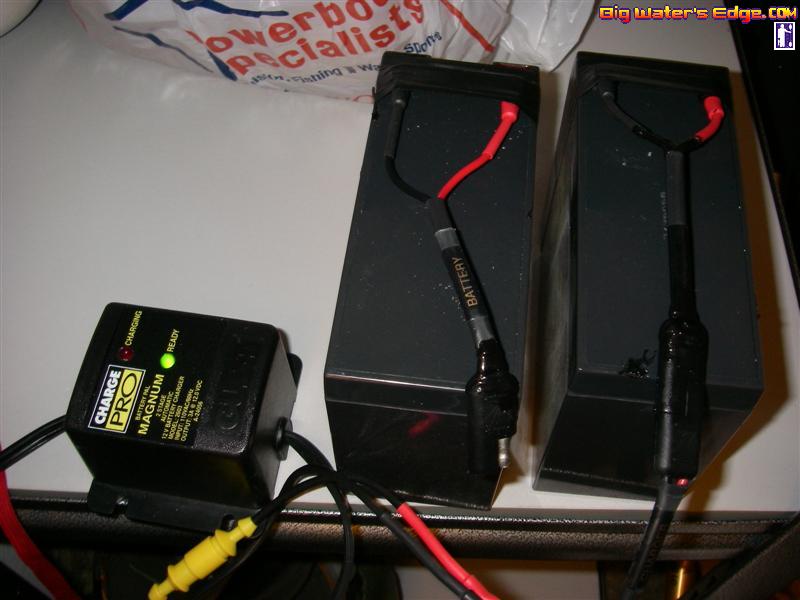 I use waterproof trailer plugs like these 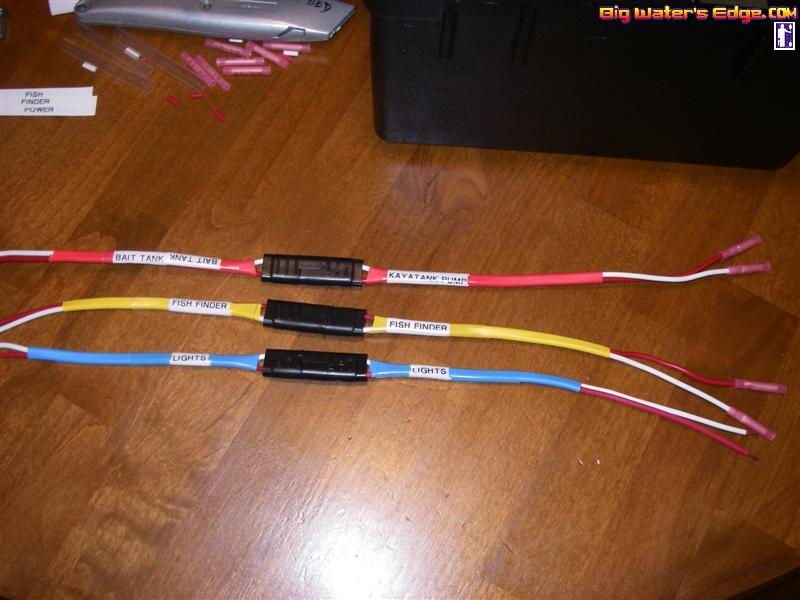 I crimp terminal lugs to one end and then attach them to the battery. Once attached, the terminals and lugs are heavily coated with dielectric grease and then taped over with electrical tape. The harness never comes off the battery after that. The other side of the plug is attached to the buss bars for the electrical distribution system. The plugs are much more durable than the battery terminals. My battery charger has a similar plug attached to the leads. This allows me to easily pull the battery and hook it up to the charger.
__________________
Douglas Gaxiola  Team No Fish- Amateur Staff Team No Fish- Amateur Staff |
|
|
|
|
12-11-2009, 10:32 PM
|
#6 | |
|
Senior Member

Join Date: Sep 2005
Posts: 1,921
|
Quote:
 Makes life sooo much easier. I just do a rough wire to the terminals, sealed by marine goop. Do this with new wires and and new battery, before salt water has a chance to corrode it. Very durable, low maintenance, works. Di-electric grease is good on the connection ends too. For the newbies, dgax65 is one of the innovative masters. If you have it on your yak, most likely it was inspired by dgax65. Look up his old posts before you rig up a yak. I'll say it again...
|
|
|
|
|
|
10-02-2017, 06:50 AM
|
#7 |
|
Kayakdoctor
Join Date: Oct 2017
Posts: 2
|
Hey Dgax65. I'm new to this forum. Had to say how nice your wiring is. Clean and waterproof. Looks like you are using heat shrinked butt connectors too. Nicely done.
|
|
|
|
|
01-16-2011, 07:03 PM
|
#8 | |
|
Junior

Join Date: Jun 2010
Posts: 24
|
Quote:
|
|
|
|
|
|
11-20-2011, 03:16 PM
|
#9 | |
|
Senior Member
Join Date: Nov 2011
Location: Escondido CA
Posts: 114
|
de-hooker
Quote:

|
|
|
|
|
|
07-11-2015, 05:30 PM
|
#10 | |
|
Junior
Join Date: Jul 2015
Location: San Diego
Posts: 9
|
bait tank inlet screen
I did not have the wire, and needed something asap, so used 100# mono.
 Quote:
|
|
|
|
|
|
| Tags |
| kayak fishing inovations, kayak rigging ideas |
|
|


 Hybrid Mode
